
Why Factory-Smooth Cabinet Finishes Fail When DIYed
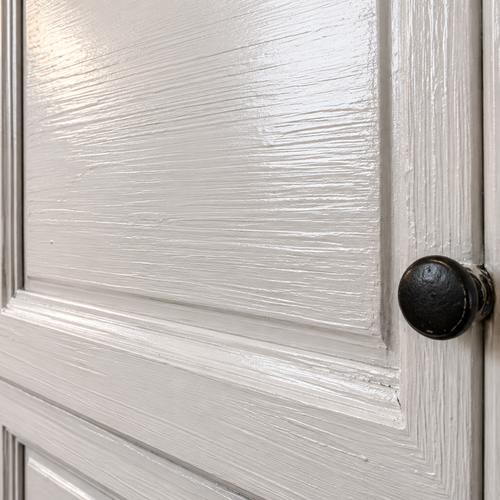
You painted your kitchen cabinets a few weeks ago. They looked passable right off the brush. Now you're catching them in afternoon light and every stroke mark reads clear as a topographic map — ridges dragging left to right across the door panel, a faint roller stipple near the edge, and a sticky patch by the pull that still hasn't hardened.
This is what cabinet painting looks like from a brush. Not always. Not inevitably. But far more often than the YouTube tutorials show, because the tutorials skip the part where a spray booth and industrial-grade coatings are doing most of the work.
Factory cabinet finishes aren't just "painted better." They're chemically different, applied through equipment you don't own, in an environment you can't replicate in your kitchen. Here's where the gap actually lives.
The equipment difference isn't technique — it's physics
Every factory-finished cabinet that left a production line got its topcoat from a high-volume, low-pressure (HVLP) spray gun in a temperature-controlled, dust-filtered spray booth. The gun atomizes the coating into a fine mist — droplets in the 30–50 micron range — that land nearly parallel to the surface. They don't pile up. They self-level before the tack sets. The result is a film of even thickness, edge to edge, no ridges anywhere.
A brush works differently. Every stroke drags through wet paint and leaves a wake — raised edges two to five mils high that start hardening within minutes. Running a brush through setting paint is like dragging a comb through concrete that's just beginning to cure: the ridges it leaves are the ridges you get. Floetrol and paint conditioners slow the dry time and help somewhat. They don't replicate spray atomization. Not even close.
Rolling isn't better. A foam roller leaves stipple. A woven-nap roller leaves lint and texture. The edges of the roller pad leave faint lines even with the lightest pressure. These show up most in high-gloss and satin finishes, especially white — surfaces that amplify every variation in film thickness by reflecting light straight across the face.
The paint from the hardware store isn't what factories use
Cabinet-grade coatings made for industrial application are a different chemistry than anything on a retail shelf. Most factory cabinet finishes use pre-catalyzed lacquer or conversion varnish — two-component systems where a catalyst triggers a chemical cross-linking reaction as the film cures. The cured film is nearly as hard as plastic. It doesn't flex under heat, it doesn't soften, and it resists moisture in ways that water-borne latex can't match.
What you buy at a hardware store is usually a water-borne alkyd enamel or an acrylic latex. These are good products for their intended use. They're just not the same chemistry. Latex cures primarily through water evaporation and oxidation, not cross-linking. The resulting film stays slightly flexible and softer. Fine for walls. On cabinets yanked open 20 times a day in a kitchen running at 75°F with steam off a pot of pasta, that softness shows up within a year as scratches, chips, and surface marring you can't paint over without stripping first.
The best retail cabinet coatings — Benjamin Moore Advance, Sherwin-Williams Emerald Urethane Trim Enamel — are meaningfully better than wall paint and can hold up well when applied correctly. But they still cure through a different mechanism than two-component industrial coatings, and they're more sensitive to prep failures.
Grease contamination is invisible and fatal to adhesion
Your cabinets don't look greasy. They don't feel greasy. They're still greasy.
Two or three years of cooking puts a layer of aerosolized oil, cooking steam, and cleaning product residue on every surface in your kitchen — including the cabinet faces and doors where you can't see any film at all. This layer is microns thick. It's chemically bonded to the existing finish. And paint cannot bond through it.
When a paint film fails — when it peels in sheets within six months, or you can scrape a section away with a fingernail without much effort — contamination is almost always the cause. The paint bonded to the grease, not to the cabinet. And the grease eventually let go.
Removing it requires an actual degreaser, not soap and water. Trisodium phosphate (TSP) substitute, or a dedicated cabinet degreaser, applied thoroughly and wiped with a clean cloth. Twice if the cabinets are near the stove. The surface has to dry completely before the next step. This is the non-negotiable prep move, and it's the one most DIY tutorials barely mention.
What sanding actually accomplishes — and why once isn't enough
Sanding has two jobs on cabinets. First: mechanical abrasion to create surface tooth — microscopic scratches the primer can grip. Second: leveling — removing drips, edge buildup, and high spots from the existing finish so the new coat doesn't just pile on top of an uneven base.
Most homeowners sand once before priming. That's a start. What matters more is sanding between coats.
Every coat of primer and paint raises the surface slightly and fills unevenly — lower sections of a panel get more film than raised sections. Sanding lightly with 220-grit between coats, just scuffing rather than cutting through, levels the built-up film and gives the next coat a flat surface to land on. Skip this step, and cabinet jobs often look fine after the first coat, then progressively worse as coats pile up. Each layer amplifies the variation underneath.
On oak specifically, this problem runs deeper. Oak is an open-pore hardwood, and the pores are large enough that primer sinks into them as it cures. More coats don't fill those pores — they build up around them, leaving visible grain texture even under three or four coats of paint. The fix is grain filler before priming: a paste or liquid product that fills the pores mechanically, sanded smooth when dry, so the primer has a flat surface to start from. Most DIY cabinet tutorials don't mention grain filler at all.
Drying and curing are not the same thing
Paint is dry to the touch in an hour or two. It is not cured.
Curing is what happens after the water flashes off — the process by which the paint film reaches its final hardness and chemical stability. For water-borne alkyds and urethane enamels, full cure takes 21–30 days at room temperature. During that window the film is soft, vulnerable to scratches, and can be dented by a door pressing against a face frame overnight.
This matters in Minnesota kitchens. Forced-air heating drops indoor humidity to 20–30% in January and February. Low humidity accelerates surface drying — the water flashes off faster — but it doesn't speed the chemical cross-linking happening in the film. What it can do is create a skinned-over surface that looks and feels dry while the layers underneath haven't hardened. Hang the doors too soon and they press against the frame, the soft film deforms, and you open the cabinet a week later to find a strip of paint has peeled off where the door compressed it.
Thirty days. That's the real timeline before the finish handles daily kitchen use.
Thick coats and what happens underneath them
The instinct makes sense: more paint in one pass, one fewer coat, done faster. The problem is physics.
A thick coat skins over at the surface while moisture and solvent vapors are still working their way out of the film below. As those vapors push through the partially set top layer, they create micro-bubbles — small enough to miss in wet paint, visible as the coat dries. On a satin or semi-gloss surface in morning light, they read as a dimpled, uneven texture. Not a finish failure. A physics failure.
Thick coats also sag. Paint is a fluid until it isn't. Applied too heavily on a vertical door surface, gravity pulls the film downward before it sets. The result is a drip run — the kind of imperfection you can sand back but can't fully erase without stripping to bare substrate.
And here's the thing most DIYers don't expect: two thin coats cover better and cure harder than one thick coat. Three thin coats are better than two. This is how factory application works — multiple passes of atomized spray, each building a few mils of film, each allowed to cure before the next one lands.
Frequently Asked Questions
Slow dry time helps but doesn't eliminate brush marks completely. Latex paint at ambient temperature has an open time of 15–30 minutes. During that window marks can partially relax. Paint conditioners extend that window — they don't replicate the self-leveling physics of spray atomization. In a dry Minnesota interior in winter, open time can be even shorter because low humidity causes the film to skin over faster.
Benjamin Moore Advance and Sherwin-Williams Emerald Urethane Trim Enamel are widely regarded as the top retail options. Both are water-borne alkyds that cure harder than standard latex. They outperform wall paint significantly for cabinet use and are more forgiving of brush application than cheaper latex. Prep — especially degreasing and sanding — still determines whether they hold long-term.
Stickiness weeks after application usually means the film hasn't fully cured. This happens with thick coats, with paint applied in temperatures below 50°F (where water-borne coatings stop curing properly), or in low humidity that causes surface drying while the film below stays soft. In a forced-air heated home in winter, the surface can feel dry while the coat underneath hasn't finished curing. It typically resolves with time — but if the surface is still tacky after 60 days, contamination underneath the coat is a likely cause.
Light use — opening doors gently — is generally safe after 7–10 days once the surface is firm to the touch. Full hardness takes 21–30 days. During the first month, avoid cleaning with ammonia or citrus-based solvents, avoid hanging heavy items on door pulls that stress the finish, and don't close doors tightly against the face frame for at least two weeks.
It depends on the contractor. Some use premium retail products like Advance or Emerald Urethane, applied with better prep and spray equipment. Others use professional-grade coatings — pre-catalyzed lacquers, conversion varnishes, or two-component water-borne urethanes — not available in retail channels. These products require proper ventilation and controlled application conditions due to catalyst chemistry. The difference in film hardness and durability is significant.
Early peeling almost always traces to adhesion failure at the substrate — contamination the paint couldn't bond through, or skipping the mechanical abrasion that would have given the primer something to grip. The paint film itself might be perfectly intact. It's just not attached to anything underneath. Primer applied to a glossy, unscuffed surface fails the same way: it looks fine for months, then lifts in sheets.
Cesar's Painting handles cabinet painting and refinishing across Woodbury, Maplewood, St. Paul, Minneapolis, Bloomington, and the Twin Cities metro. We use professional-grade cabinet coatings and proper spray application on projects where the finish demands it. Call (651) 650-4747 to schedule a free estimate.
