
Drywall Nail Pops: Why They Return and How to Stop Them
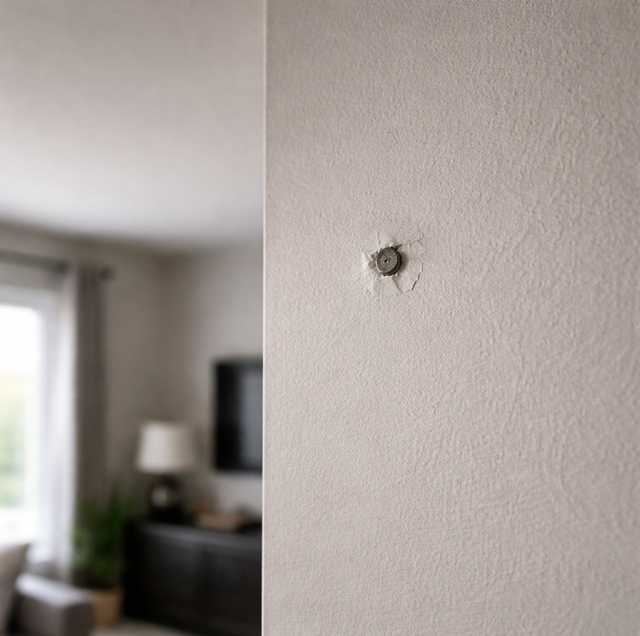
You wiped down the wall before painting and felt it: a small round bump near the ceiling, maybe with a hairline crack or a flake of compound already lifting. Run your hand along the wall, and you find a few more, often marching in a rough line down a stud. A nail pop looks like a cosmetic blemish, but it is really a report from inside the wall telling you the fastener is no longer doing its job.
Painting over it without addressing the fastener is like re-taping a box whose bottom has already split. The surface looks fine for a while, then the same bump reappears under your fresh coat.
What a Nail Pop Actually Is
A sheet of drywall is held to the wood framing by nails or screws driven through the panel into the studs. The fastener head sits in a shallow dimple, and a thin skim of joint compound covers it so the wall reads flat and smooth.
A nail pop happens when that fastener backs partway out of the stud. As the head lifts, it pushes against the compound covering it. The compound has no flex, so it cracks, domes up, and eventually breaks free as a little disc or flake. What you see on the surface is the compound failing. What actually moved is the fastener behind it.
The key point, and the reason repaint jobs fail, is that the wood and the fastener move relative to each other. The drywall stays roughly where it was. The stud behind it shrinks, swells, or shifts, and the nail rides that movement outward until its head shows through the finish.
The three surfaces in play
- The stud: solid wood framing that changes dimension with its moisture content.
- The fastener: the nail or screw anchoring the panel to that stud.
- The compound: the brittle skim over the head, which is the first thing to give.
Why Nail Pops Happen
Most pops trace back to wood movement, fastening quality, or both together. Understanding the cause matters, because the same conditions that created the first pop are still present and will create the next one if you only address the surface.
Lumber drying and shrinking: Framing lumber is often installed while it still holds a fair amount of moisture. As that wood dries toward the moisture level of the conditioned home around it, it shrinks, mostly across its width and thickness rather than its length. A 2x4 that loses moisture pulls its faces inward slightly. A nail driven into the face of that stud does not shrink with the wood, so the drying stud effectively slides back along the shank and the head is left standing proud behind the drywall. This is why brand-new homes and freshly framed additions see a wave of pops in the first year or two as the lumber gives up its moisture.
Humidity cycling through the year: Wood never stops responding to the air around it. In damp conditions the framing takes on moisture and swells; in dry conditions it releases moisture and shrinks. That back-and-forth happens in every climate, wet season and dry season alike, and it works a fastener loose the same way bending a paperclip repeatedly does. Each cycle is tiny, but the fastener only ever migrates in one direction: out. A wall can look perfect for years, then start popping once enough cycles have accumulated.
House settling: New construction settles as the structure takes on its full load and the ground beneath it compacts. Framing members shift a hair, panels rack slightly, and fasteners near the movement get nudged loose. A handful of pops after a settling season is normal. Widespread pops appearing alongside cracks over doorways or windows are a different signal and deserve a closer look.
Nails versus screws: A smooth nail resists pulling out only by friction against the wood. As the wood shrinks and swells around it, that grip loosens, and the nail walks out. A drywall screw threads into the wood and holds mechanically, which is far harder to reverse. Homes fastened primarily with nails, common in older construction, are simply more prone to popping than homes hung with screws.
Fasteners set wrong the first time: Installation quality decides a lot. A fastener driven too deep tears the paper face of the drywall, so it has almost nothing to grip and lifts at the first bit of movement. One driven not deep enough leaves the head proud from day one. A fastener that misses the stud, or catches only its edge, was never anchored to begin with. These pops tend to show up early and cluster where one installer had a bad run.
Why Repainting Over a Pop Never Holds
A pop is a loose fastener wearing a thin mask of compound. When you sand the bump flush, skim it, and repaint, you have replaced the mask. You have not re-anchored anything. The fastener is still loose, the wood is still cycling, and the head is still traveling outward. Give it a season or two, and it lifts your new compound exactly as it lifted the old.
Fixing a pop for good means taking the movement out of the equation: pin the drywall firmly back to the stud so the panel cannot flex, then deal with the offending fastener, then refinish. Skip the anchoring step, and you are painting on borrowed time.
How to Fix a Nail Pop Before You Paint
The following is the standard approach a painter uses on interior drywall. Before you sand anything, a safety note that matters in older homes: paint applied before 1978 may contain lead, and sanding it releases hazardous dust. If your home predates that era, test the paint or assume lead is present and follow lead-safe practices rather than dry-sanding in the open. Wear a proper dust mask and eye protection for any sanding, lead or not.
In homes built before 1978, paint may contain lead, and sanding it releases hazardous dust, so test the paint or assume lead is present and follow lead-safe practices instead of dry-sanding in the open. Wear a dust mask and eye protection for any sanding. Before driving anchoring screws, find the stud and stay mindful of wiring and pipes, which can run through framing bays near outlets, switches, and fixtures.
1. Re-anchor the drywall to the stud: Drive a drywall screw into the same stud about an inch or two above the pop, and another the same distance below it. Sink each screw just below the paper surface so the head sits in a shallow dimple without tearing the face. These new screws pull the panel tight against the framing and take the load off the failed fastener. Find the stud before you drive, and stay mindful of what runs inside the wall, since wiring and pipes can travel through framing bays near outlets, switches, and fixtures.
2. Deal with the popped fastener: For a popped nail, either drive it back below the surface and dimple it, or pull it out entirely if it has lost its grip. For a popped screw, back it out and reset it below the surface, or remove it. Whatever you do, the old fastener should end up recessed in a clean dimple, not standing proud.
3. Fill and feather: Fill both dimples, the old fastener spot and the new screws, with joint compound. Apply two to three thin coats rather than one thick one; thick compound shrinks and cracks as it dries. Feather each coat wider than the last so the patch blends into the surrounding wall instead of leaving a raised island. Let each coat dry before the next.
4. Sand smooth: Once the final coat is dry, sand the patch flush with the wall using a light touch, feeling for any ridge with your hand. Wear the dust mask and eye protection here. Wipe the dust away so the primer has a clean surface to grab.
5. Prime the patch: Prime every spot you filled before you paint. Bare joint compound drinks up paint at a different rate than the painted wall around it. If you skip primer, those patches telegraph through the finish coat as dull, slightly different-looking circles even after the wall dries, a defect called flashing. A quick coat of primer over each repair evens out the porosity so the finish reads uniform.
When Pops Signal Something Bigger
A few scattered pops in a home going through its first year, or after a big swing in indoor humidity, are routine maintenance. What deserves more attention is a pattern.
If pops appear in large numbers across several rooms at once, run in long lines, or show up alongside cracks that climb from the corners of doors and windows, the wall may be reporting structural movement rather than ordinary wood shrinkage. Doors and windows that have started sticking in their frames point the same direction. When the surface symptoms cluster like that, it is worth having someone look at the framing or foundation before you invest in a full refinish, so you are not chasing the same cracks again next year.
Treat the isolated bump as a patch job. Treat the pattern as a question about the structure.
Frequently Asked Questions
A pop is round and centered on a single fastener; a seam crack runs in a straight line along a taped joint where two panels meet. They fail for related reasons but get repaired differently. A seam crack usually needs the loose tape cut out and re-bedded in fresh compound or replaced with mesh tape, whereas a pop needs re-anchoring and a spot patch. If you see both, address the fastener pops first, since a loose panel puts extra stress on the nearby seams.
Lightweight spackle is fine for a shallow dent, but a nail pop leaves a wider, feathered repair that joint compound handles better. Compound sands to a finer feather edge and blends more invisibly across the several inches a proper pop patch covers. Spackle also tends to flash more under paint. For a repair you are going to prime and paint, compound gives the cleaner result.
Setting-type compound, the kind you mix from a powder that hardens by chemical reaction on a timed set, shrinks far less than premixed and is worth using for the fill coats on a stubborn or deeper repair. Premixed all-purpose compound is easier to feather for the final skim. Many painters use a setting-type for the first coat to lock the patch, then a premixed topcoat for a glass-smooth finish.
Yes, and re-anchor generously. A wall that is already popping is a wall whose fasteners are working loose, and hanging weight nearby adds stress. Drive your anchoring screws, then locate the stud again for the picture hardware itself rather than relying on a drywall anchor near a compromised area. Fixing the pop first also means you are not drilling through a patch you just feathered.
Keeping indoor humidity in a stable middle range slows the moisture cycling that loosens fasteners, so it reduces how fast new pops form, but it will not reset a fastener that has already backed out. Steady indoor conditions are a preventive measure, not a repair. The pops already showing still need to be re-anchored and refinished by hand.
Wait until the final compound coat is fully dry and you have primed it, which for premixed compound generally means giving each coat several hours and confirming it has lightened to a uniform color with no gray damp spots. Painting over compound that is still holding moisture traps that moisture and can cause the topcoat to blister or the patch to flash. When in doubt, give it extra time; drywall compound is patient, and the finish coat is not forgiving of a rushed patch.
Book a wall inspection before your repaint — catch the loose fasteners before they crack your fresh coat. Cesar's Painting serves Minneapolis, St. Paul, and the Twin Cities. Call (612) 203-5856.
