
Why Exterior Caulk Cracks in Cold Climates—and How to Stop It
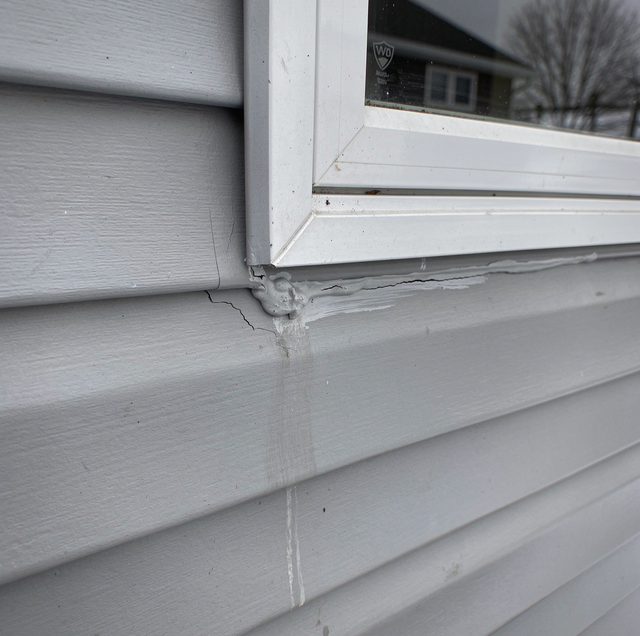
Look closely at the seam where your trim meets the siding after a long winter, and something will usually catch your eye: a hairline gap, maybe a curl of caulk lifting at the edge where a smooth bead used to sit. That gap didn't show up overnight. It's the result of years of a sealant being asked to do something it eventually can't keep up with.
What Caulk Is Actually Supposed to Do
Exterior caulk isn't paint, and it isn't filler, unlike spackle. It's a flexible sealant, most often acrylic latex or siliconized acrylic on a repaint, applied wherever two different building materials meet: trim against siding, window and door frames against the wall, corner boards, and other joints where wood, fiber cement, or masonry come together at different rates of movement.
The core idea is that those materials expand and contract at different rates as temperatures change, and the caulk bridges that movement so water can't get behind it. A good bead stretches and compresses with the joint rather than tearing.
That flexibility has limits, though. Every caulk product is manufactured with a rated movement range, usually expressed as a percentage of the joint width, and a rated temperature range for application and performance. Ask it to move further than that, over and over, for years, and it stops behaving like a flexible seal and starts behaving like a brittle one.
The Mechanism: How Cold Stresses a Flexible Seal
This is where climate does the damage. A joint that sits through a hot, humid summer and then a stretch of sub-zero weeks each winter is being asked to expand and contract across a much wider swing than a joint in a mild climate ever sees. Siding and trim materials move with those swings, wood especially, and the caulk between them has to keep pace.
Cold makes that harder in a specific way. As temperatures drop, caulk loses elasticity and becomes stiffer, much like a rubber band goes brittle in a freezer. A joint that opened and closed smoothly in October has far less give by January. If the joint keeps moving while the caulk has lost most of its flex, something has to give, and it's usually the caulk itself, either splitting down the middle of the bead or letting go of one side of the joint entirely.
Repeat that cycle every winter for several years, and the damage adds up even in caulk that looked fine after year one. The bead hardens, shrinks slightly as it ages, and loses adhesion at the edges before it ever shows a visible crack. By the time you can see daylight or feel a gap with your finger, the seal has usually already been compromised for one or two seasons.
From Cracked Line to Peeling Paint: Why One Failure Causes the Other
You'll often notice paint peeling near a window frame or along a piece of trim and treat it as a separate problem from the cracked caulk a few inches away. It usually isn't separate. It's the second half of the same failure.
Once a caulk joint splits or pulls away, it stops keeping water out of that seam. Rain, snowmelt, and condensation work their way behind the siding or trim at exactly that point. Wood swells when it absorbs moisture, and the paint film has no way to stay bonded to a surface that's swelling and shrinking beneath it. That's what shows up as blistering, then peeling, in a band right around the failed joint, well before the rest of the wall shows any wear.
This is also why a paint job that looks fine everywhere except around the windows and trim so often traces back to caulking, not to the paint itself. The paint on the flat wall surfaces was never exposed to trapped moisture. The paint at the joints was. Left long enough, that same moisture path can carry into the wall assembly and show up as staining or damage on the interior side, not only as a cosmetic problem on the exterior.
Signs Your Caulk Has Already Failed
You don't need to wait for visible peeling to catch this early. A few things worth checking each spring:
Hairline splits down the center of the bead: The earliest visible sign, usually appearing first on south- and west-facing walls that see the widest daily temperature swings.
Caulk that's pulled away from one side of the joint: Even if the bead itself looks intact, a gap on one edge means it's no longer sealing.
A chalky, hard texture instead of a slight give when pressed: Caulk that's lost its flexibility will feel stiff and won't spring back when you press it with a thumb.
Small cracks in the paint film directly over a caulk line: This is often the first visible clue that moisture is already getting behind the surface.
None of these mean the whole exterior needs attention at once. They do mean that the joint is no longer doing its job, and moisture has an open path behind the surface until it's addressed.
What Correct Prep Looks Like Before Repainting
Caulking is exterior-paint prep work, not a separate task bolted onto the end of a job. Painting over cracked or failing caulk without addressing it first just seals a moisture path under a fresh coat, and that fresh coat tends to fail faster than the one before it.
Three things matter most in that prep:
Full removal of the old caulk: Cut and scrape out the failed bead completely, rather than caulking over it, so the new sealant bonds to a clean substrate on both sides of the joint instead of to old, hardened material.
A caulk rated for the actual temperature swing it will face: Not every acrylic or siliconized acrylic product is rated the same way, and a product suited to a milder climate can fail faster than one rated for a wider range of movement and lower minimum application temperatures.
Correct cure time before paint goes on: Most exterior caulks need to skin over and cure fully before they can flex properly and hold paint without cracking at the surface. Painting over caulk that hasn't cured yet can trap moisture in the bead itself and undermine both the seal and the paint film above it.
Skip any one of those three steps and the new caulk is likely to fail again well before the paint around it does, which just resets the same cycle a season or two later.
Why the Repaint Only Lasts If the Caulk Is Right
A full exterior repaint is only as durable as its weakest joint. Fresh paint applied over solid, properly cured caulk and sound substrate can withstand years of freeze-thaw cycling and do what it's supposed to do. Fresh paint applied over old, brittle caulk is really just buying a short delay before the same cracking and peeling shows up again, usually in the same spots.
That's the reason caulk inspection belongs at the start of any exterior paint project where winters run below freezing for weeks at a time, not as an afterthought once the color and sheen are picked out. The joints take the most movement stress on the whole building, and they're the first place a freeze-thaw climate finds weakness.
Frequently Asked Questions
Most acrylic latex and siliconized acrylic caulks are rated for somewhere between 10 and 20 years under stable conditions, but where joints go through heavy freeze-thaw cycling, high-movement spots like window corners often need attention closer to the 5 to 8 year mark.
Caulking over failed caulk usually builds the new bead too wide for its depth, and a bead wider than roughly a 2 to 1 width-to-depth ratio can't flex properly no matter how well it sticks. Getting it right means cutting out the old bead first, typically with an oscillating multi-tool or a dedicated caulk-removal blade, and setting backer rod into any joint wider than about 1/4 inch before the new bead goes in.
Darker caulk and darker paint absorb more solar heat, which raises the surface temperature of a south- or west-facing joint well above the surrounding air temperature and widens the daily expansion and contraction range the caulk must handle.
Pure silicone has excellent flexibility in cold weather but doesn't accept paint well, which is why siliconized acrylic, a hybrid that keeps some of that flexibility while still taking a paint finish, is the more common choice for painted exterior trim and siding joints.
Most standard acrylic latex products shouldn't be applied below about 40 degrees Fahrenheit, since the caulk needs enough ambient warmth to skin over and cure properly; applying it in cold weather is a common reason a fresh bead fails within a year.
Yes, and it's often misdiagnosed: a stain can appear several feet from the actual leak point because water tends to track sideways along a top plate or windowsill before it finds a place to drip down. That's why interior staining near a window frequently gets blamed on a roof leak or an ice dam instead of the failed caulk joint that actually let the water in.
Caulk is a small material doing a big job: holding the line between your home's framing and a climate that swings from summer heat to weeks below freezing. A cracked joint spotted in spring is a five-minute fix; the same joint left through another freeze-thaw cycle turns into stripped paint and exposed wood by fall.
Schedule an exterior caulk and paint inspection — a walk-around check of your trim, siding joints, and window and door frames to catch failing caulk before it turns into peeling paint or hidden moisture damage. Cesar's Painting serves Minneapolis, St. Paul, and Bloomington. Call (612) 203-5856.
