
Drywall Repair Before Painting: Why It Matters
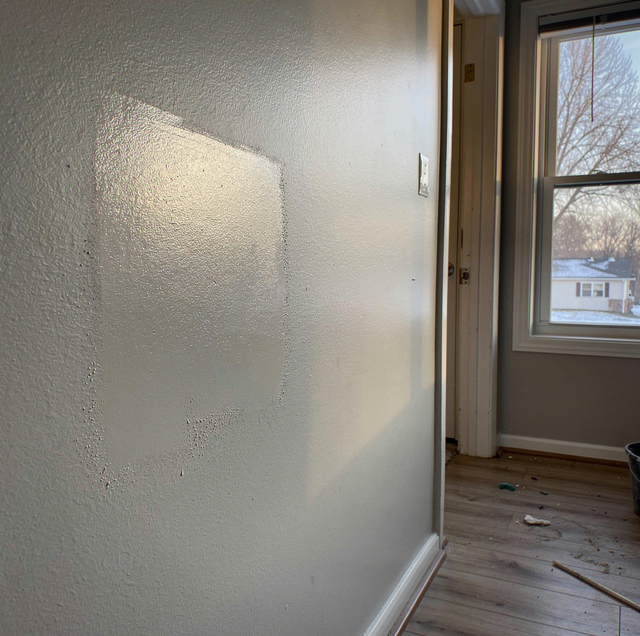
A fresh coat of paint looks flawless under the store aisle lights, and it looks pretty good going up on the wall, too, at least for the first day or two. Then the afternoon sun comes in low through a window and rakes sideways across that same wall, and every dent, every faint ridge from an old repair, and every patch where the texture doesn't quite match suddenly stands out. Paint didn't create any of that. It just stopped hiding it.
Why Paint Reveals Wall Flaws Instead Of Hiding Them
Bare drywall and old paint both do a decent job of camouflaging small surface flaws, mostly because dull, worn finishes scatter light in every direction at once, softening shadows and blurring edges. A new coat, especially a fresh one in a lighter color or a satin or semi-gloss sheen, does the opposite. Smoother, glossier films reflect light more directly, and a direct reflection makes even a shallow dip or a slightly raised patch cast a small shadow it never cast before.
This is why a wall that looked perfectly smooth under old, flat, sun-faded paint can suddenly show every flaw once a fresh coat goes on, particularly under raking light, meaning light that hits the surface at a low, sideways angle rather than straight on. Windows, angled ceiling fixtures, and even a lamp positioned close to a wall all create that kind of light. A texture mismatch that was invisible under overhead lighting becomes obvious the moment the sun crosses the wall in the late afternoon.
None of this means new paint is somehow flawed. It means paint is an honest material. It shows you the surface underneath, magnified rather than softened, and that's exactly why the condition of the drywall matters more than most people expect before a repaint even starts.
Common Drywall Issues Worth Fixing Before You Paint
Most walls headed for a fresh coat carry at least one of these problems, and each one shows up differently once paint goes over it.
Nail pops: A small round bump, sometimes with a hairline crack, where a fastener has backed slightly out of the framing behind the panel. Left alone, the bump telegraphs straight through a new coat, and painting over it without re-anchoring the panel means it tends to return within a season or two.
Hairline cracks: Thin cracks along a taped seam, in a corner, or radiating from the top of a door or window frame. Small, isolated cracks are usually cosmetic. Cracks that keep reopening after being filled, or that run in a pattern across several spots, are worth a closer look before repainting rather than after.
Dents and dings: Furniture bumps, doorknobs punching through drywall, or the small dish-shaped dent left by anything hitting the wall at an angle. These are simple to fill but easy to underestimate, since a shallow dent that looks minor in daylight can cast a visible shadow the moment a lamp or window light crosses it at an angle.
Uneven texture from a prior patch: A repair done quickly, or with a different tool or compound than the rest of the wall, often dries with a slightly different surface texture than the surrounding drywall. Paint doesn't blend that difference away. It usually makes the mismatch easier to spot, since a slightly rougher or smoother patch reflects light differently from the surrounding wall.
Peeling old paint or leftover wallpaper residue: Loose paint, bubbling in an old finish, or a thin film of adhesive left behind after wallpaper comes down all sit between the new coat and the actual wall surface. New paint bonds to whatever is directly beneath it, and if that's failing paint or tacky residue instead of solid drywall, the new coat inherits that instability.
Why Skipping Repair Leads To A Worse, Shorter-Lived Paint Job
Two separate problems arise when repair is skipped in favor of just rolling paint over an imperfect wall.
The first is bonding. Paint needs a clean, stable, reasonably even surface to grip. Dust, chalky old paint, or a film of wallpaper adhesive sits between the new coat and the wall itself, and the new coat ends up bonding to that unstable layer rather than to solid drywall. A surface that's still shedding fine dust from an old repair, or one still holding old paint that's already losing its own grip, gives a fresh coat almost nothing reliable to hold onto. That's a large part of why paint over an unprepped patch or an unstable old finish tends to fail sooner than paint applied to a properly cleaned, sound surface.
The second problem is visual, and it's often the one that actually gets noticed first. A dent, a raised nail pop, or a texture mismatch doesn't get filled in by paint. It gets outlined by it. Even two or three coats of quality paint form a fairly consistent, thin film across the wall, thin enough to follow the contour of whatever is underneath rather than leveling it out. A flaw that was subtle under old paint often reads as more obvious under new paint, not less, precisely because the new film is more reflective and the color is more uniform everywhere except at the flaw.
Put those two problems together, and the pattern is consistent: paint applied over unrepaired drywall tends to look worse sooner. It needs another round of work sooner, which usually costs more time in the long run than addressing the wall first would have.
The Prep Sequence That Actually Holds Up
Good drywall prep before painting follows roughly the same order every time, and skipping a step, or doing them out of sequence, is where most of the shortcuts show up later.
Patch: Fill dents, dings, nail pops, and cracks with the appropriate compound, feathering each layer wider than the last so the repair blends into the surrounding wall rather than sitting as a raised island. Deeper repairs usually need two or three thin coats rather than one thick one, since a thick application shrinks unevenly as it dries and often cracks on its own.
Sand: Once the final coat is fully dry, sand the patch flush with the surrounding wall, feeling for any ridge or dip with your hand rather than trusting your eyes alone. This step is also where a texture mismatch is corrected by matching the surrounding wall's texture on the patch, rather than leaving a smooth spot next to an orange-peel or knockdown finish.
Prime: Bare joint compound and old, worn paint both absorb a fresh topcoat at a different rate than the rest of the wall. Skipping primer on a patched area is one of the most common reasons a repair shows up as a slightly duller or shinier circle even after the topcoat dries, a defect often called flashing. Primer evens out that absorption so the finish coat reads the same everywhere.
Paint: Only after the patch is filled, sanded flush, and primed does the topcoat go on. Applying the final coats to a properly prepped surface is what lets the finish look uniform and hold its bond over years rather than months.
Doing these steps out of order, sanding before compound has fully cured, or painting before primer, tends to undo whatever the earlier steps accomplished, since each step depends on the one before it being finished correctly.
Deciding Between Simple Patching And A Full Skim Coat
Not every wall needs the same level of repair, and it helps to have a rough way of telling the two situations apart before work starts.
Simple patching is usually enough when the issues are isolated: a handful of nail pops, a dent or two, a short crack along a seam, or one section where old wallpaper residue needs to be cleaned off. These repairs stay local to the specific spot, and a careful patch-sand-prime sequence on just that area blends in without needing to touch the rest of the wall.
A full skim coat, a thin layer of joint compound applied across the entire wall surface, is worth considering when the problems are spread out rather than isolated: texture that varies noticeably from one patched area to the next, a wall with years of accumulated small dents and repairs that never quite matched, or a surface where several different people have patched different sections over time with different tools. A skim coat resets the entire surface to a single consistent texture, which is often faster and produces a cleaner result than blending a dozen individual patches into a wall that already has inconsistent texture in several places.
The general rule is scale. A few scattered flaws call for spot repair. A wall where the flaws themselves have become inconsistent with each other, not just present, is usually a sign the whole surface needs to be brought back to one level before paint goes on.
Frequently Asked Questions
Flat paint hides more than a glossy or satin finish does, but it still doesn't fill a dent or a crack. A shallow dent that's barely visible under flat paint in daylight can still cast a shadow once a lamp or a low winter sun crosses the wall at an angle, so it's worth filling even under a forgiving sheen.
Most premixed joint compound requires several hours per coat, and a deeper patch built from two or three layers needs each layer to dry fully before the next is applied. A patch that still looks gray or feels cool and slightly damp to the touch is not ready to sand, and sanding it too early tends to smear rather than shape the compound.
Combination products are formulated to reduce the need for separate priming for routine repaints over sound, previously painted surfaces, but they generally aren't designed to seal bare joint compound the way a dedicated primer is, so patched areas usually still need a real primer coat before the topcoat goes on.
A crack that reopens along the same line, rather than remaining filled, usually means the underlying panel or seam is still moving, whether from settling, a nearby loose fastener, or seasonal humidity swings. Filling it again without addressing that movement tends to produce the same crack in the same place within a year or so.
Some texture differences right after sanding are common, especially on a wall with a heavier orange-peel or knockdown finish, since matching that texture by hand requires a deliberate technique rather than just smoothing the patch flat. Priming and painting usually reduce the visible difference, but a poorly matched texture can still show under strong side lighting.
If the peeling comes off in small, brittle flakes down to a solid, intact surface underneath, scraping and priming is usually enough. If pulling at one loose edge causes a much larger sheet to lift, or if the surface underneath feels soft, chalky, or crumbly rather than solid, the wall likely needs a broader strip-and-reseal approach before it's ready for paint.
Schedule a drywall and wall-surface prep check before your repaint — a walkthrough that identifies nail pops, cracks, dents, and texture issues, and lays out whether the wall needs simple patching or a full skim coat before paint goes on. Cesar's Painting serves Minneapolis, St. Paul, and Bloomington. Call (612) 203-5856.
