
6 Signs Your Cabinets Need Repainting, Not Just Cleaning
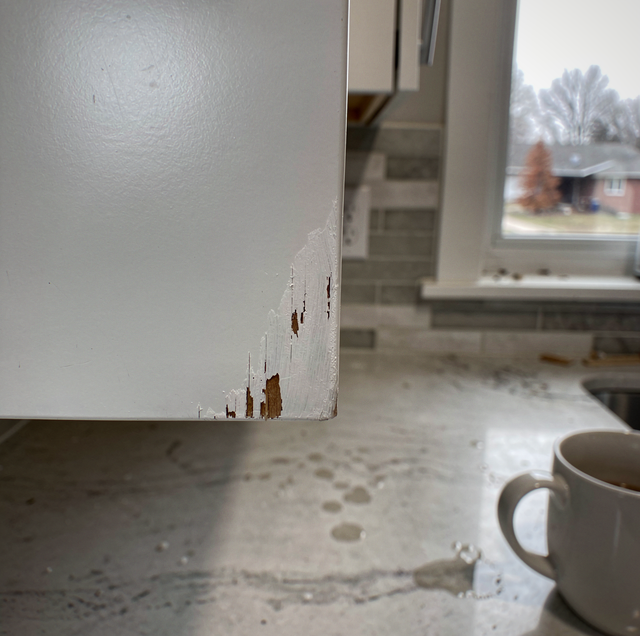
You reach for the cabinet door next to the stove the way you have a thousand times, and this time your fingers stick a little. There's a faint tackiness to the paint, almost as if the surface never fully dried. A few feet away, near the pantry handle, the finish has worn down to a pale ring where a hand grabs the same corner every single day. Underneath the color, you can see something lighter: primer, or maybe bare wood. You wipe it all down anyway, because that's the habit, and the grime lifts off the counter and the backsplash just fine. The cabinet still looks tired.
That gap between "clean" and "actually looks good" is the whole story. A lot of homeowners spend months scrubbing at a problem that a rag was never going to fix, because the issue isn't dirt sitting on top of the paint. It's the paint itself breaking down underneath it.
Why A Wipe-Down Only Goes So Far
Cabinet finish takes more abuse than almost any other painted surface in the house. Walls get touched occasionally. Trim gets bumped now and then. Cabinets get gripped, pulled, splashed, and steamed on multiple times a day, every day, for years. Add heat rising off a stovetop, grease particles floating through the air during cooking, and the humidity swings that come from running a dishwasher or boiling water in a closed kitchen, and you've got a finish that's fighting a low-grade chemical and physical battle nonstop.
Paint and clear coats are built to flex a little with temperature and moisture changes, but only within a range. Push past that range often enough, and the film starts to lose its grip on the wood underneath. That's adhesion failure, and it shows up first at the points under the most stress: door edges, handle areas, and anywhere a surface flexes when it opens and closes. Big seasonal swings between a heated, dry house in the cold months and a hot, humid one later in the year put extra strain on that bond every year the finish ages. None of that is unique to any one kind of house or any one climate. It's just physics acting on a painted surface that gets used hard, and it's a big reason interior cabinet work tends to get scheduled during the stretch when people are spending more time indoors staring at their own kitchen.
Think of cabinet finish like the clear coat on a car. Regular washing keeps a car looking decent for a long time, but once the clear coat starts to crack, peel, or turn chalky, no amount of washing can bring back the shine. At that point, you're not maintaining a finish anymore. You're driving around on a surface that's already failed, and the only real fix is a new coat down to bare, prepped material.
Here are the signs that tell you which side of that line your cabinets are on.
Sign 1: Chipping Or Flaking At Edges And Corners
Door edges and the corners around hinges take the hardest physical hits: bumped by dishes, knocked by cutting boards being carried past, brushed by kids and pets moving through the kitchen. When you see small chips exposing raw wood or primer at these spots, the paint film has lost its bond right there. A single touch-up might hide one chip. Multiple chips scattered across several doors mean the finish is failing as a system, not just at one unlucky spot.
Sign 2: A Sticky Or Tacky Film Near The Stove And Sink
That tackiness you feel when you open a cabinet by the range isn't always fresh grease. Cooking oil vaporizes and settles as a thin film, and over months that film bonds with the paint's surface, softening it and pulling pigment and sheen along with it. If a degreaser and a soft cloth remove the stickiness and the underlying sheen still looks even and glossy, you're dealing with buildup, which is a cleaning job. If the tackiness returns within days, or the paint underneath looks dull and slightly gummy even after cleaning, the finish has broken down and is no longer sealing the wood as it should.
Sign 3: Wood Grain Or Substrate Showing Through Worn Spots
Run your hand across a cabinet door, and cabinets with failing paint often reveal patches where you can feel or see the wood grain, MDF surface, or old finish layer poking through. This usually shows up first around handles and pulls, on the underside of upper cabinet doors where hands grip to open them, and along the bottom edge of doors that get bumped by knees and hips. Once you're down to bare substrate in multiple spots, you're not looking at a cosmetic touch-up anymore. Moisture and grease now have direct access to unprotected wood, and that's how warping and staining start.
Sign 4: Yellowing, Fading, Or Uneven Color From Panel To Panel
Cabinets near a sunny window fade differently than cabinets tucked in a shadowed corner. Cabinets over the stove often yellow faster than those on the far side of the kitchen because heat and airborne grease accelerate the breakdown of certain finishes. The result, years later, is a kitchen where the color doesn't match door to door anymore. This one is trickier because it isn't damage in the structural sense. But once color has shifted unevenly across a set of cabinets, cleaning can't correct it. Only a fresh, uniform coat brings everything back to one consistent shade.
Sign 5: Cracking, Alligatoring, Or A Chalky Surface
Alligatoring is the term for a finish that cracks into a pattern of small, connected lines, resembling the texture of a reptile's skin. It happens when an older, more rigid coat has lost flexibility and can no longer move with the wood as temperature and humidity shift throughout the year. A related warning sign is a chalky residue that rubs off on your fingers when you touch the surface. Both point to a finish that has aged past the point where it can keep protecting the wood. Painting over cracked or chalky paint without addressing it first usually telegraphs the same pattern back through the new coat within a season or two.
Sign 6: Doors That Stick, Rub, Or Don't Close Flush
Sometimes the tell isn't visual; it's mechanical. A door that used to swing shut cleanly now catches on the frame, or two doors that used to line up flush now overlap unevenly. Wood swells and contracts with moisture, and a healthy finish helps slow that movement down by sealing the surface. When the finish has failed, wood absorbs and releases moisture more freely, and that extra swelling is often what you're feeling when a door binds. Hinges can sometimes be adjusted as a stopgap, but if the underlying wood is moving more than it used to, the seal that should be limiting that movement isn't doing its job anymore.
Cleaning Versus Repainting: A Simple Way To Tell The Difference
If you're standing in your kitchen trying to decide which category your cabinets fall into, a quick test can help. Clean one troublesome door thoroughly with a mild degreaser and a soft cloth, then dry it and look closely under good light. If the sheen is even, the color looks consistent, and nothing feels sticky or gritty afterward, you're dealing with grime, and regular cleaning will keep things looking good for a while longer. If the sheen still looks patchy, if bare spots or chips remain, if the surface still feels slightly tacky or chalky, or if you found multiple failure signs from the list above on more than one or two doors, cleaning won't close that gap. At that point, you're looking at a repaint or a full refinish, which strips the compromised layer, repairs and preps the underlying surface, and rebuilds a proper protective finish from scratch.
Why Cabinets Wear Out Faster Than Trim Or Walls
It's worth understanding why kitchen cabinets tend to need attention years before the walls around them do. Trim and wall paint mostly deal with ambient light and occasional dusting. Cabinets deal with direct hand contact, heat, steam, and grease on a daily cycle, plus the mechanical stress of doors opening and closing thousands of times a year. Add a climate with real seasonal swings, where a house runs in dry heat for months and then swings into a humid stretch later in the year, and the wood and finish expand and contract on a yearly rhythm on top of the daily wear. That combination is exactly why cabinets are usually the first painted surface in a house to show real finish failure, long before the trim or the walls need a second look.
What A Proper Repaint Actually Involves
A cabinet repaint that's going to hold up isn't a matter of rolling a new color over the old one. It starts with removing doors and hardware, cleaning off grease and residue completely, and sanding or deglossing the surface so the new coat has something to grip. Any chips, gouges, or bare spots get filled and smoothed before anything else happens. Primer goes down to seal the substrate and block stains or old color from bleeding through, and then the finish coats go on, usually sprayed for the smoothest, most even result, with adequate dry time between coats and before doors go back on their hinges. Skipping steps in that sequence is usually why a cabinet repaint fails again within a year or two: the new paint is only as good as what's underneath.
Frequently Asked Questions
Spot-painting a single chip can work as a short-term patch, but paint sheen and color rarely match perfectly once dry, especially on cabinets that have aged or faded unevenly, so most spot repairs end up visible as a slightly different patch rather than blending in.
Because doors and drawer fronts are usually removed, prepped, and finished away from the kitchen while boxes are painted in place, most households go several days without full use of their cabinets, and the kitchen is often only partially usable during that stretch.
Yes. Dense hardwoods like maple or oak accept and hold a bonded finish differently than MDF panels or engineered wood, and grain patterns in some species can telegraph through paint over time if the surface wasn't properly sealed before the topcoat went on.
New hardware can refresh the overall look and is a common finishing touch after a repaint, but it does nothing for the finish itself, so chips, stickiness, and uneven color around the doors will still be visible right next to the new pulls.
A repaint is exactly when most people change color, since the surface is already being stripped down and rebuilt anyway, making it a natural point to move from a dated shade to one that better fits the rest of the room.
Refinishing generally means stripping down to bare wood and reapplying a stain or clear finish that shows the grain, while painting builds an opaque color coat over a properly sealed and primed surface. The choice between them depends on whether you want the grain visible or fully covered.
Schedule a cabinet finish assessment — Cesar's Painting will check your cabinets for adhesion failure, worn edges, and uneven finish, and let you know honestly whether cleaning, spot repair, or a full repaint is the right call. Cesar's Painting serves Minneapolis, St. Paul, and Bloomington. Call (612) 203-5856.
